|
PulseGuide 1.26 - January 9 2004
Bug fixes only.
PulseGuide 1.25 - November 22 2003
- Added a third Declination axis test. To do this test you must remove the declination axis cover and watch the gear train. Or, you can observe the motion at night by looking at a star with very high power.
- The focuser control now has a position counter. When a button is pressed the focuser will be sent pulses slowly at first and will accelerate as you keep the button pressed.
PulseGuide 1.21 - October 1 2003
- New mount initialization window that can configure the mount the same way every time you start it.
- A new dialog that implements Rolands Backlash test functions.
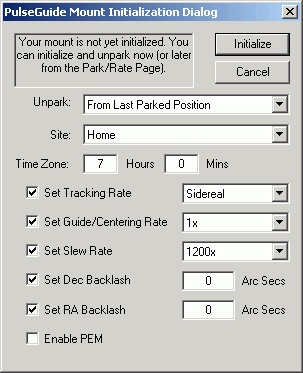 New Initialization Dialog New Initialization Dialog
When PulseGuide detects the mount is in the powered up and unparked state (RA=0, Dec=90) it will automatically pop up the Initialization dialog to the right. From this dialog you can set up and review which parameters PulseGuide will immediately configure.
Supported parameters are unpark position, Site, Time Zone, Tracking Rate, Guide Rate, Slew Rate, Dec and RA backlash, and PEM enable.
All parameters that you set will be remembered and displayed in this dialog the next time you initialize the mount.
Rolands Backlash Tests
Roland posted some tests that you can run on your AP mount to see if it has a potential problem with Dec movement. Ive added the two tests in PulseGuide 1.21and later.
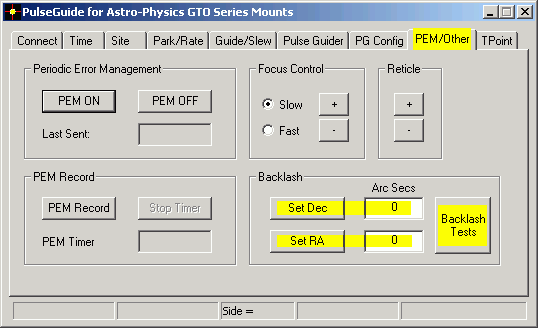
Ive used a yellow highlighter to denote the important steps you must take to do the tests.
1. First, go to the PEM/Other tab.
2. Change the Dec and RA backlash values to zero and press the Set Dec and Set RA buttons.
3. Press the Backlash Tests button. This will bring up the following dialog:
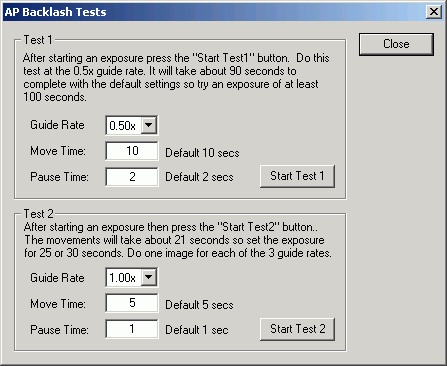
Test 1
Before starting Test 1 set up your camera control program (e.g. MaximDL, CCDOps, etc.) to do a 100 second exposure. You can also set up an auto-dark exposure, but make sure that you start the test when the camera control software is exposing the light image.
 Once you start the exposure press the Start Test 1 button. With the default settings (recommended) the entire procedure will take about 90 seconds. Once you start the exposure press the Start Test 1 button. With the default settings (recommended) the entire procedure will take about 90 seconds.
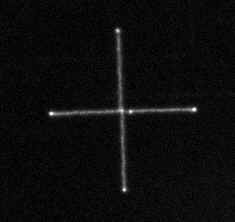
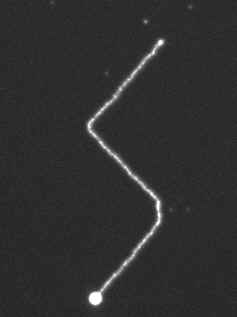
Test 1 will move the scope in this manner: East - pause - West - pause - East to center - North - pause - South - pause - North to center.
The stars in the resulting exposure should look something like the image to the right. The scale might be different but you should see what looks like many plus signs in the image.
If you take the image near Dec=0 the height and width will be about the same. Although not shown in this particular image the East and West points will be slightly brighter than the North/South points. This will make it easy for Roland to establish the orientation of the camera.
After you connect to the mount go to Parameters that you set will be remembered the next time you initialize the mount.
Test 2
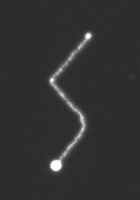
 You will run Test 2 three times, once for each of the guide rates. Before starting this test set up your camera control program (e.g. MaximDL, CCDOps, etc.) to do a 25 second exposure. You can also set up an auto-dark exposure, but make sure that you start the test when the camera control software is exposing the light image. You will run Test 2 three times, once for each of the guide rates. Before starting this test set up your camera control program (e.g. MaximDL, CCDOps, etc.) to do a 25 second exposure. You can also set up an auto-dark exposure, but make sure that you start the test when the camera control software is exposing the light image.
Start by setting the Guiderate at 1x. Once you start the exposure press the Start Test 1 button. With the default settings (recommended) the entire procedure will take about 16 seconds.
Although the scale might be different, the stars in the resulting exposure should look something like the image shown.
For reference the actual movement in Test 2 is: North+West - South+West - West only (the pause setting) - North+West.
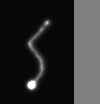
Now you will need to repeat the tests at 0.50x and 0.25x. The star patterns will look similar but smaller because the movement rate is slower. Here are two examples taken with my Traveler:
 Test 2 at 0.50x Guide rate Test 2 at 0.50x Guide rate
 Test 2 at 0.25x Guiderate (ignore the gray border on right, that is from the image processing application) Test 2 at 0.25x Guiderate (ignore the gray border on right, that is from the image processing application)
FINALLY...
After running the tests, please crop a bright star in each of the four images like I have done. Save them as a high-quality JPEG, making sure to stretch it appropriately so that it is not too dim or overexposed. If you dont know how to do that then just use the cropped FITS files.
Then send the 4 files (preferably zipped to save bandwidth) to Roland (chris1011 AT aol DOT com - change the AT and DOT to @ and ., respectively).
After submitting these tests AP will advise you if anything appears anomalous and if so what can be done about it.
Version 1.20
- Improved internal logic to prevent commands from overlapping.
- Additional movement buttons, ability to rotate buttons.
- New Measurement results dialog.
- Park to AP Park Positions or user-defined Alt/Az.
- Unpark from AP Park Positions or user-defined Alt/Az.
- Improved accuracy when setting and retrieving time.
- Focus control.
- Reticle brightness control.
- Backlash control.
- Local serial time displayed in status bar (instead of sidereal time).
- Numerous minor user interface changes.
Version 1.10
- New status bar on the bottom of the window displays RA, DEC, Side of mount the scope is on, the current sidereal time, and the hour angle (angle of the scope relative to the meridian). The status bar is not part of any of PulseGuides tabs so it displays all time while the mount is connected.
- Optionally the PulseGuide application will place itself always on top of other windows.
- New Locations tab allows user to save and restore an arbitrary number of locations (longitude/latitude). PulseGuide can easily send whichever location you choose to the mount.
- New TPoint tab allows you to quickly resynchronize your mount to your TPoint(TM) Model in TheSky(TM).
- In addition to stopping the mount the Delayed Stop feature can now Park the mount. Parking de-energizes the motors so that autoguider signals or serial commands will not move the mount.
- When unparking the mount the mounts longitude, latitude, and time zone are sent in addition to the PC time.
- You can swap the positions of the N/S and E/W move scope buttons.
- Goto manually entered coordinates.
- Sync to manually entered coordinates
- STOP movement button to stop a GOTO if necessary
- When one of the Set Guide/Centering Rate buttons is pressed the rate is now displayed in the center of the Move Scope buttons (in addition to the Last Sent edit box).
- PulseGuide now updates RA and Dec every second instead of every other second.
- Removed the ALT/AZ option (tell me if you need it back in).
- Other miscellaneous changes.
|
